Saturday, May 21, 2016

What Can You Do with Self-Striping Sock Yarn Besides Knit Socks?

Knitting Pattern Suggestions from Round Table Yarns for Merlin: What can you do with self-striping sock yarn besides make socks?

Self-striping sock yarn has become pretty popular lately and quite a few indie dyers (myself included) offer it. It is a labor of love for those dyers who make it--although it takes a lot of work to dye it, it's so much fun to knit! Even using just a basic sock pattern, you can let the yarn do the work and still end up with a really neat pair of socks.

But what if you're not a sock knitter? At the fiber festivals I went to this year, quite a few people stopped to admire my self-striping sock yarn but moved along, saying, "I don't knit socks." But you don't have to move along. If you love self-striping sock yarn but have no idea what you'd make with it, I have some ideas for you.

Think about length of color repeats

The key with self-striping sock yarn is to think about the length of the color repeats. Most dyers make repeats long enough to knit somewhere from 3-8 rounds of a typically sized sock for one color. If you expand the circumference (or width) of a knitted item too far beyond that, the color repeats are going to come more quickly and won't give as much of a striped effect.

For example, knitting a hat with self-striping sock yarn might work, but it also might mean each color shows up for just 1-2 rounds of the hat. Or, for example, if you try a triangular shawl that increases on each row, you'll find that the stripes don't work out evenly as you increase the number of stitches, and at some point you might end up with a stitch count that uses more than one color on just one row, completely losing the striped effect of the yarn. These options might work for you, but you'll have to experiment and take these projects on a case-by-case basis.
 

Use a smaller circumference similar to socks

The first thing you can do is make sure that the rounds in your project are a smaller size, similar to what you'd find with socks. One of my favorite patterns for this is Frankenfingers by Elizabeth Green Musselman. This pattern is for a pair of fingerless gloves--although fingerless isn't quite right as there are fingers; the fingers just don't have tips. Not only do you have the stripes going down the arm of the mitt, but think about the possibilities with the half fingers section: you could knit each one a different color within the self-striping yarn. And you could do each glove differently so they match because of the colors and stripes but have different colors along the fingers. So many possibilities!


Use a narrow width

If you'd prefer to knit something flat rather than in the round, you'll want to keep the width of the item fairly narrow so as to make sure the stripes have enough room to form. It doesn't have to be super narrow. A typical sock has 64 stitches in a round, so as long as you don't go any wider than that in a flat object, you should be fine. You could try a simple garter stitch or stockinette stitch scarf. Or even a ribbed scarf.

But just because you should keep rows on the narrow side doesn't mean you're limited to a narrow finished object. Designer Frankie Brown has a series of "Ten Stitch" patterns that are based on knitting very narrow strips, but joining them in a way to create a much larger item, such as a blanket or a shawl (and joining as you go, not with seaming!). Self-striping sock yarn would be perfect for these patterns!

Ten Stitch Blanket
Ten Stitch Triangle
Ten Stitch ZigZag
Ten Stitch Corner


Knit on the bias

The main benefit of self-striping sock yarn is exactly in its name: it allows you to create stripes without having to change yarn colors and have tons of ends to weave in. So play with that property a bit by trying a project that knits on the bias, which includes chevron patterns.

For example, I knit a Totally Biased cowl using Round Table Yarn Merlin in the Pavilion colorway. The way biased knitting works is that it forms rows at an angle, so it is perfect for showing off the stripes of self-striping yarn.

Knitting Pattern Suggestions from Round Table Yarns for Merlin: What can you do with self-striping sock yarn besides make socks?
Biased knitting is also how chevrons are usually created. Just doing a Ravelry search for "chevron" led me to a ton of possibilities for patterns to use with self-striping sock yarn. Here are some of my favorites:

Chevron Sock Yarn Scarf by Amanda Gill (Amanda was my knitting instructor at my LYS back in Indiana!)
Chevron Scarf by Joelle Hoverson
ZickZack Scarf by Christy Kamm
Chevron Cowl by Shannon Sanchez
Waving Chevron Scarf by Lee Meredith


Work Mitered Squares

Another element that is often worked by changing colors of yarn is the mitered square. Let the self-striping do the work for you and see what magical possibilities the mitered square might open for you.

For example, I knit a couple of mitered squares as examples (Round Table Yarns Merlin in Pavilion). You can make a ton of these and sew them together to make a blanket or scarf (there is also a way to join them as you go so you don't have to do any seaming). But I actually decided to make these into Christmas tree ornaments! (I wrote up some notes for what I did on my project page on Ravelry in case you'd like to make these yourself.)

But there are so many things you can do with mitered squares. Here are just a few of the possibilities:

Mitered Square Wrap and Shawl by O/C Knitiot Designs - Deby Lake
Mitered Square iPad Mini Case by Jocelyn Aufseeser
Mini Mochi Mitered Eyelet Shawl by Gail Tanquary
Polar Bear Express - Mitered Square Ornaments by Tess Mattos
Domino Star Stashbuster Afghan by Anita Grahn
Breakwater Shawl by Katherine Matthews


Other Ideas (Share Yours!)

There are lots of other ideas for using self-striping sock yarn that don't quite fit the above categories, such as the Barn Raising Quilt (although technically it's a form of mitered square). Or you could even just make a pom pom (which I also turned into a Christmas tree ornament).

Knitting Pattern Suggestions from Round Table Yarns for Merlin: What can you do with self-striping sock yarn besides make socks?
And there were so many other pattern ideas that I saw that I didn't list here because I didn't want to overwhelm you with too many links (although I may have already done that).

So I'd like to invite you to the group bundle I've created over in the KarenDawn Designs/Round Table Yarns group on Ravelry. First, join the group if you haven't already. Once you're a group member, you can add patterns you find that work with self-striping yarn to the bundle. I can't wait to see your suggestions!

Knitting Pattern Suggestions from Round Table Yarns for Merlin: What can you do with self-striping sock yarn besides make socks?

~~~~~~~~~~~~~~~~~~~

The content in this post was first featured in my newsletter (December 5, 2015). If you'd like to keep up to date on my designs and yarn and receive content like this right in your email inbox, make sure to subscribe to my newsletter.
Saturday, May 14, 2016

Making Yarn Lemonade from a Yarn Lemon

Behind the Scenes of Yarn Dyeing with Round Table Yarns: Making Yarn Lemonade from a Yarn Lemon

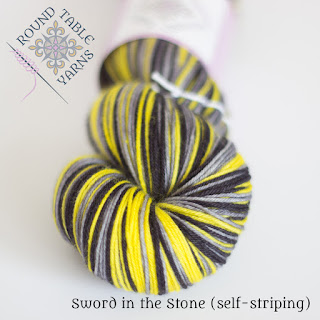
I was dyeing some of the Sword in the Stone self-striping, which is yellow, grey, and black.

Behind the Scenes of Yarn Dyeing with Round Table Yarns: Making Yarn Lemonade from a Yarn Lemon
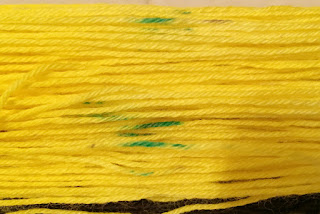
At the same time in another pot, I was dyeing a new teal colorway. When I took the Sword in the Stone out to dry, I noticed that, somehow, some of the teal dye had splashed onto the yellow section of Sword in the Stone!
Behind the Scenes of Yarn Dyeing with Round Table Yarns: Making Yarn Lemonade from a Yarn Lemon
I had three skeins of Sword in the Stone involved in this mishap and I was hoping that the teal was just on one or maybe two of the skeins. But when I reskeined the three skeins, there was teal on all three. What to do? Dye is transparent rather than opaque, so whatever is underneath a color will still show through (so I couldn't just redye those spots with yellow). I debated several options and decided that I'd try overdyeing the whole skein in teal.

This is how it came out (before and after). You can see some of the yellow still coming through the teal.

Behind the Scenes of Yarn Dyeing with Round Table Yarns: Making Yarn Lemonade from a Yarn Lemon
At first, I was just going to have these three skeins be a Quest colorway (meaning not repeatable), but I got a lot of positive response on this colorway on Instagram and at the Blackland Prairie Artisan and Fibre Faire last year. And all three skeins sold quickly. So I've given this colorway a name, and will occasionally offer it in the shop and at festivals. And if it's not available, but you do see some Sword in the Stone in the shop, just let me know that you'd like this overdyed version, and I'd be happy to dye it for you.

This color is now The French Book Saith.
Behind the Scenes of Yarn Dyeing with Round Table Yarns: Making Yarn Lemonade from a Yarn Lemon
Why that name? It comes from Malory's Morte D'Arthur. While Sir Thomas Malory was in prison (in the 15th century in England), he used the time to write the story of King Arthur, which became one of the greatest works of Arthurian literature. He used various source material while writing his version, including some French sources. Throughout the Morte, Malory often introduces material with the words "as the French book saith"; however, most of the time when Malory uses that phrase, when checking his French sources, scholars have found that the French book did not actually say what Malory claims it did.

In the Middle Ages, having source material and proving that you were using the source material was actually a way of legitimizing the text being written. Although stories were certainly created "from scratch," most stories were different versions of a prior story (and many scholars, including myself, spend a lot of time comparing versions to see what is different, which is usually where commentary and analysis come into play). So for Malory, using this phrase would give legitimacy to what he was writing, even when (especially when) the text was something Malory was introducing into the story rather than something from his source material.

So I felt this name was appropriate for this overdyed yarn since it is technically a version of one of the other colorways and yet at the same time is something all on its own.

~~~~~~~~~~~~~~~~~~~

The content in this post was first featured in my newsletter (November 5, 2015). If you'd like to keep up to date on my designs and yarn and receive content like this right in your email inbox, make sure to subscribe to my newsletter.

Saturday, May 7, 2016

Pattern Suggestions: Camelot

Pattern Suggestions from Round Table Yarns for Camelot a fingering weight yarn blend of merino, cashmere and nylon

One of my most popular yarn bases is Camelot, which is a blend of merino, cashmere, and nylon (fingering weight). I love this yarn; it is super soft--yet strengthened by the nylon--and really takes color well. So for those of you who have some Camelot or for other skeins of MCN in your stash, here are some suggested pattern ideas for 1-2 skeins.

Oakenshield by Elizabeth Helmich - A hat pattern inspired by Tolkien, available as a beanie or a beret; the details on this hat would look great with a tonal/semi-solid yarn color.

Jana by Veronika Jobe - This shawl pattern is knit sideways, so by weighing your yarn, you can make it as big as your skein will allow--which also means you'll get to make the most of your skein of MCN, using up every delicious bit of it. You can also add beads, which I think makes the shawl a little extra special.

Weathertop Socks by Claire Ellen - Because of the nylon content in this yarn, it is quite suitable for making socks. And these socks are very eye-catching and look like they would be a lot of fun to make. But do look at the pictures on the pattern page--make sure to chose a semi-solid yarn color because all the work of the design gets lost in a variegated yarn.

Lórinand by Amora Designs - Another Tolkien-inspired pattern, these fingerless mitts look really nice. And (as I discovered last year), fingerless mitts make a really great gift (I did five pairs for Christmas presents last year!), especially for teacher gifts.

Midnight Craving by Jennifer Weissman - This crescent-shaped shawl will take two skeins, but I'm really loving the cable and slightly ruffled border. I think this one needs to be added to my queue.

Lady Bertilak Cowl by Karen Robinson (me) - Although I have my Perceval base listed as the recommended base for this cowl pattern (and it works up quite nicely with Perceval), knitting it in Camelot, with that tiny bit of cashmere, would make this an extra soft cowl to drape around your neck.

Which of these patterns is your favorite?

~~~~~~~~~~~~~~~~~~~

The content in this post was first featured in my newsletter (October 5, 2015). If you'd like to keep up to date on my designs and yarn and receive content like this right in your email inbox, make sure to subscribe to my newsletter.

Saturday, April 30, 2016

Behind the Scenes: Taking pictures of yarn


Being an indie business means that I wear a lot of different hats. One that I struggle with is the "photographer" hat, and I've tried a lot of different setups over the years. But it's only recently that I've found a setup for yarn photos that I like, so I wanted to share that with you for this newsletter.

When I first started taking photos of my yarn, I wanted an "interesting" background. I had bought an Amish-made basket from Woolgatherings a few months before that and thought it would make an interesting backdrop.

Behind the Scenes of Yarn Dyeing with Round Table Yarns: Taking Pictures of Yarn
But I noticed that the pictures were pretty dark overall, and when all placed together on the same website, the overall color was just "dark" which de-emphasized the bright colors of the yarn.

A few people suggested that I use the typical white background for the pictures. I resisted. But it wasn't just because I wanted to be different. It was because I thought getting good white background photos would be a ton of work, involving light boxes and special lighting and whatnot. I've tried that in the past and hated the experience.

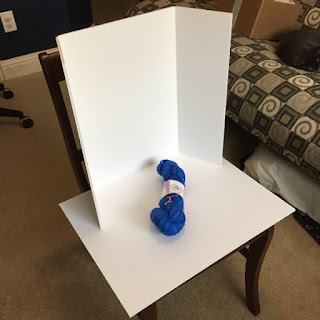
So I tried something else with the help of this blog post. I bought some white foam board: one piece that was flat and one that was tri-fold. I tried a few different locations and times of day until I settled on the mid-morning light coming in from the window of my craft room. I set up a chair, placed the flat foam board on the seat, and placed the tri-fold foam board on the back of the chair, so it could bounce the light from the window down to the yarn.

Behind the Scenes of Yarn Dyeing with Round Table Yarns: Taking Pictures of Yarn
I also used some settings on my camera, including my 50mm macro lens, to help with the white balance (the blog post linked above goes into detail about suggested settings). And I did do a little post-process editing, although I found that once I had my optimal setup, the photos needed very little editing.

So it took me a while, but all of my current inventory has been re-photographed and everything in my shop is up to date. And now when I look at the overall image of the shop, I see a much lighter and much brighter image. And the background fades away, allowing the yarn to be the center focus.

Behind the Scenes of Yarn Dyeing with Round Table Yarns: Taking Pictures of Yarn
This makes me want to do the same thing to my personal yarn stash so my Ravelry stash page looks nice as well. Hmm... *adding note to my "to do" list*

Behind the Scenes of Yarn Dyeing with Round Table Yarns: Taking Pictures of Yarn
Here's the old picture. I still find the background interesting, but then again, the background isn't supposed to be the focus!

Behind the Scenes of Yarn Dyeing with Round Table Yarns: Taking Pictures of Yarn
And here's the new white background picture. The eye is now focused on the yarn rather than the background.
Updated August 31, 2016: I've still been struggling a little with getting the white background to be truly white. I discovered an iPhone app called Snapseed that I now use for editing my photos. It allows you to edit specific areas of the photo, so I can edit the white background by brightening the area without also brightening the yarn color.

Here's an example of a newer picture:


~~~~~~~~~~~~~~~~~~~

The content in this post was first featured in my newsletter (October 5, 2015). If you'd like to keep up to date on my designs and yarn and receive content like this right in your email inbox, make sure to subscribe to my newsletter.

Saturday, April 23, 2016

Evolution of my pattern template

Behind the Scenes of Designing Knitting Patterns with KarenDawn Designs: Evolution of My Pattern Template

My first pattern that I released for the public was the Criseyde Scarf. I designed it during a class at my then LYS and thought I might write more patterns but wasn't sure. So I used my limited graphic design skills, put together a layout, and posted the pattern on Ravelry.

Two years after that, I started designing more seriously and wanted to develop a better-looking layout. So as part of what I was looking for when I found my tech editor, I asked if she could help me come up with a pattern template. Because I used knitCompanion a lot, I wanted my pattern template to be super easy for someone to use in knitCompanion.

Almost a year later, I felt like I needed something else. Something to add some "oomph" to the layout. But I didn't really know what to do. So I left most of the layout as it was and added some colored boxes on the front page and rounded the edges of the pictures.

And then I saw what Elizabeth (from Stitch Definition) had done to the layout for the Gawain's Shield collection. It is so beautiful. I wanted that feeling for my individual patterns as well. I tried to do it myself. But I just couldn't come up with something that I was happy with. So I turned to Elizabeth and asked for her help. And she came up with a new pattern layout for me. When I saw it, I was amazed. It seemed so simple, yet she had paid attention to tiny details (such as echoing the circle in my logo) that really made the layout look amazing.

So updated all of my previous patterns with the new layout. I also took the time to polish some of my first patterns (no changes to the actual pattern but just a refinement of instructions or details here and there).

Here's a look at how my Criseyde Scarf pattern has evolved:

Behind the Scenes of Designing Knitting Patterns with KarenDawn Designs: Evolution of My Pattern Template

Behind the Scenes of Designing Knitting Patterns with KarenDawn Designs: Evolution of My Pattern Template

Behind the Scenes of Designing Knitting Patterns with KarenDawn Designs: Evolution of My Pattern Template
What do you think? Do you like the new layout?

One of the things I love most about it is that I'm now able to include the "story behind the name" section so the story that used to be available just on the Ravelry description is now on the pattern itself.


~~~~~~~~~~~~~~~~~~~

The content in this post was first featured in my newsletter (August 20, 2015). If you'd like to keep up to date on my designs and yarn and receive content like this right in your email inbox, make sure to subscribe to my newsletter.
Saturday, April 16, 2016

Behind the Scenes: Self-striping sock yarn Reskeining Process

Behind the Scenes of Yarn Dyeing with Round Table Yarns: Reskeining Process for Self-Striping Sock Yarn

So now I have the yarn dyed, but it's still in that gigantic loop. I need to get it into the smaller circumference skein so it is ready to go to a new home. (Could you imagine if I sent out the giant loop? What would you think?)

This is when I go back to the warping reel and put the yarn back in place. I go through and cut off all of those choke ties I had put on, thankful that I took the time to do that because it makes putting the skein back on the warping reel much easier. I then combine the warping reel with my swift (using it as a skein winder) and wind the yarn back down into a more manageable sized skein. This doesn't take as long as winding the yarn onto the warping reel, but it can easily take up to an hour depending on how many skeins are on there (2-4 usually).


Behind the Scenes of Yarn Dyeing with Round Table Yarns: Reskeining Process for Self-Striping Sock Yarn
Once I have the yarn reskeined, I twist it up and label it and sigh. Yes, it was a lot of hard work. But imagine the socks it will make!

Behind the Scenes of Yarn Dyeing with Round Table Yarns: Reskeining Process for Self-Striping Sock Yarn

Behind the Scenes of Yarn Dyeing with Round Table Yarns: Reskeining Process for Self-Striping Sock Yarn

Behind the Scenes of Yarn Dyeing with Round Table Yarns: Reskeining Process for Self-Striping Sock Yarn

Behind the Scenes of Yarn Dyeing with Round Table Yarns: Reskeining Process for Self-Striping Sock Yarn


~~~~~~~~~~~~~~~~~~~

The content in this post was first featured in my newsletter (August 5, 2015). If you'd like to keep up to date on my designs and yarn and receive content like this right in your email inbox, make sure to subscribe to my newsletter.
Saturday, April 9, 2016

Behind the Scenes: Self-striping sock yarn Dyeing Process

Behind the Scenes of Yarn Dyeing with Round Table Yarns: Dyeing Process for Self-Striping Sock Yarn

The dyeing itself can be done in a few ways. I've seen people using mason jars within a water bath (either crock pot or pot on the stove), but my current setup isn't big enough to hold multiple mason jars, so I'm using a different method. I dye one color (sometimes two) at a time.

I find the colored ties and choose one section, placing it in the dye pot. I use the crock pot lid to hold the yarn in place. I let that color set and then move onto the next section and dye it. I continue like that until I've dyed all of the colors. If I am doing four colors, I will sometimes dye the sections opposite one another at the same time, using two crock pots. But this means that I'm technically going through the dye process 2-4+ times for each colorway, which can take
up almost an entire day's worth of dyeing time!

Behind the Scenes of Yarn Dyeing with Round Table Yarns: Dyeing Process for Self-Striping Sock Yarn

Problem!

I was moving right along with my self-striping dyeing and then I hit a huge problem. Color creep. This pink/green colorway pictured below (Erec and Enide Variant) is a good example of that. I dyed the pink first and then when I dyed the green, the dye just moved right on past that crock pot lid and into the pink, creating a 2-4 inch section of a dark color. No! I really wanted much cleaner transitions between colors.


Behind the Scenes of Yarn Dyeing with Round Table Yarns: Dyeing Process for Self-Striping Sock Yarn

I tried multiple fixes, including using clips or super tight choke ties at the color changes, but that still didn't work well.

Then I got that spin dryer I mentioned in the last newsletter. So I soaked the yarn like usual but then put it through the spin dryer before putting it into the dye pot, thinking that if the yarn was less wet, the color might not wick too far into the other section. I then put the yarn through the spin dryer in between each section of dyeing.

I also added gravity to the mix. Before, I had a shallow bowl that I placed beside the crock pot to hold the sections of yarn that were not being dyed. Now I use a tall bucket so the yarn is coming down into the crock pot (which is what is shown in the above picture).

These two factors (dryer yarn and gravity) seem to have done the trick and I'm getting much cleaner transitions between colors now. Whew!

~~~~~~~~~~~~~~~~~~~

The content in this post was first featured in my newsletter (August 5, 2015). If you'd like to keep up to date on my designs and yarn and receive content like this right in your email inbox, make sure to subscribe to my newsletter.