Saturday, March 26, 2016

Behind the Scenes: Drying and Reskeining

Behind the Scenes of Yarn Dyeing with Round Table Yarns: Drying and Reskeining

When I started dyeing, I was using a salad spinner to spin out the excess water in the yarn before hanging it to dry.


Behind the Scenes of Yarn Dyeing with Round Table Yarns: Drying and Reskeining

My arm got really really tired and I wasn't able to get very much water out. It took skeins 24-48 hours to dry, and my Avalon base with the silk took even longer. I don't have a lot of space to dry skeins, so I couldn't dye very fast because I didn't have the space to dry the yarn! (I dry yarn in our guest shower.)
Behind the Scenes of Yarn Dyeing with Round Table Yarns: Drying and Reskeining

I had heard other dyers talk about using a spin dryer (basically a small portable dryer) and thought that I might look into that at some point. Then, someone in my local knitting group had ended up with two spin dryers and mentioned that she was considering selling one. I decided to take the plunge and buy it. And I am so glad that I did! It has made a world of difference in my dyeing, both in the drying time (less than a day now, even for the silk yarn!) as well as for the self-striping yarn.
Behind the Scenes of Yarn Dyeing with Round Table Yarns: Drying and Reskeining

Once the yarn is dry, I reskein it. Some dyers reskein their yarn and some don't. For me, I think the finished skein looks neater when reskeined, so I choose to take this extra step (although I sometimes wish I didn't because it takes up a lot of time!). Right now, I have a set up for reskeining that I'm not thrilled with. At some point I plan to get an actual reskeiner or an electric skein winder, but for now, I'm using what I have: a horizontal swift and a ball winder. Here's what I do:

I put the yarn on the swift and wind it into a cake. I then take that cake and rewind it into a skein using the swift (the picture below is of winding it into a cake, but the image shows the "handle" that I use as I reskein [top left corner]). It's definitely a workout for my right arm! But I've been listening to and watching a lot of podcasts while I do the reskeining, which makes the time go by much more enjoyably.
Behind the Scenes of Yarn Dyeing with Round Table Yarns: Drying and Reskeining

Once I have the yarn all reskeined onto the swift, I tied it off using choke ties to keep the yarn from tangling. I've been using cotton yarn for these ties in various colors. Here's a little secret: the color yarn used for the choke ties is actually coded for the yarn base. Although I can tell the bases apart, it's nice to just be able to see at a glance what base the yarn is. (See below for the color code--now whenever you see a picture of my yarn even without a label, you can identify the base yourself!)

After that, I remove the skein from the swift and give it a few twists, fold it in half, slip one side into the other side's loop, and voila! Skein of yarn all prettified and ready for a label.
Behind the Scenes of Yarn Dyeing with Round Table Yarns: Drying and Reskeining

Color coding for choke ties
Guenevere: light green
Perceval: white
Gawain: brown
Camelot: reinforcement thread in variegated purples/blues/reds
Galahad: tan
Avalon: dark green
Lancelot: orange
King Arthur: salmon

~~~~~~~~~~~~~~~~~~~

The content in this post was first featured in my newsletter (July 5, 2015). If you'd like to keep up to date on my designs and yarn and receive content like this right in your email inbox, make sure to subscribe to my newsletter.

Saturday, March 19, 2016

Behind the Scenes: Immersion Dyeing


Behind the Scenes of Yarn Dyeing Immersion Dyeing

Besides choosing the types of dyes to use, I also needed to chose my technique for adding heat to the yarn. This decision was based upon two factors: the kind of yarn I like and my dyeing set up.

Looking at the yarn that I have in my stash and what I'm most attracted to, I see a lot of semi-solids and tonal colors. Although variegated yarn looks beautiful in a skein, sometimes it can be a challenge to find a pattern that works well with it. And the types of projects that I knit and design usually use elements of lace or cables, which doesn't work extremely well with variegated yarn. So to get the tonal quality, immersion dyeing seemed to be the best option.

With immersion dyeing, I heat up a pot of water, add acid and dye, and add yarn. I let it "cook" for a while (until the water is clear, which means the yarn has taken up all the color and the dye bath is "exhausted"). Then I let it cool, rinse it, and dry it. I thought about using big stock pots on my stove top, but I have a three-year-old boy plus three cats, so leaving something on the stove with an open flame for an hour seemed like a bad idea. So I decided to use crock pots for dyeing. It works really well for my space and the rest of the occupants in my house.

I can still make variegated colorways, but they are a little more time intensive than other options (hand painting and steaming). But for now, immersion dyeing is working well, and I enjoy seeing the tonal qualities of the colors on the yarn.

~~~~~~~~~~~~~~~~~~~

The content in this post was first featured in my newsletter (July 5, 2015). If you'd like to keep up to date on my designs and yarn and receive content like this right in your email inbox, make sure to subscribe to my newsletter.

Monday, March 14, 2016

My Vacation to French Polynesia

Last week, my husband and I took a vacation to Tahiti (French Polynesia). We stayed on two islands, Bora Bora and Moorea. My brother-in-law and his wife went with us but all the kids stayed behind with grandparents (thank you so much to the grandparents for child care!). Or rather, I should say that we went with my BIL and his wife because they're the ones who invited us and because this was the third time that they've gone there!

Now, I'll be honest, traveling to Tahiti is expensive. And normally this would not be a trip that was within our budget. But my BIL knows some tricks, and that's how we were able to pull it off. The trick? Credit card points. He told us exactly which credit cards to take out when to maximize on our points. We'd each open up a credit card account, do the action required to get the points (such as spend $1000 within three months--super easy when you do things like pay your bills with the card), pay off the charges immediately, and close the credit card account. By using the credit card points, we were able to purchase our flights from Los Angeles to Tahiti and four of the nights we stayed in Bora Bora, saving us literally thousands of dollars. We still had to pay for some things (flight to LA, flight within the islands, and the house on Moorea), but it make the trip much more manageable. In fact, we wouldn't have been able to go without using the points. But enough about that. Let's get to the actual trip!

We left Dallas late afternoon and left LA late evening, which meant, theoretically that we could sleep on the plane to Tahiti and be ready to start the day when we landed the next morning. (There is only a 4 hour time difference between Tahiti and Dallas, so that wasn't too bad.) I say theoretically because sleeping on the plane doesn't always happen and isn't the greatest sleep. And indeed, I didn't sleep very well on the plane. But I was also too groggy and restless to do much of anything else.

When we got to Tahiti (the actual island of Tahiti; French Polynesia is made up of several islands), we still weren't done traveling. We were starting our stay in Bora Bora, which meant we had to get on another little plane to fly from island to island. Right away, I learned that the climate there was really hot. And that's coming from someone who grew up and still lives in Texas! And not every place had air conditioning, including the airport (there were lots of fans, which helped but didn't really do as much as AC would have). So we started sweating right away while in line at customs. Ugh. But we got on the little plane and flew to Bora Bora. The view from the window was amazing because the water was just so blue and clear. Incredible!

When we landed on Bora Bora, I discovered that our journey still wasn't at an end. We needed to take a boat to the hotel we were staying at. And it wasn't a short boat ride! Finally, we got to the resort and after a quick tour, we were taken to our beach bungalows. Although I appreciated the incredible view we were getting, I have to admit that I didn't partake of that view very much at first. Instead, I found myself lying down on the little couch (yay for air conditioning in the bungalow!) and trying to get rid of a headache. My husband, BIL, and his wife decided to go get pizza at a place BIL/wife had been before and bring it back to eat. When they got back, we all devoured our pizzas (which was quite good)! (We had pizza at this restaurant a few times during our trip.)


After that, I felt much better and walked out onto the beach for a while, once again marveling at how clear the water was. My husband and I decided to just go ahead and get in the water right away, so we changed into our swimsuits and waded in. The water was shallow for quite a ways so we were able to easily go out and swim to some coral formations not too far from our bungalow. Snorkel masks in place, we got to see tons of fish swimming around the coral. (Later during our visit, we saw a ray swimming around in that area, which was really cool!)

That night, we went to Bloody Mary's, which is apparently a pretty famous restaurant, for dinner. As luck would have it, they were having "Country Night" that night, and we all laughed when we told them we were from Texas. I have to admit that I don't like seafood, so while my husband took advantage of the wonderful selection of seafood, I stuck to sausage and chicken. The restaurant definitely had a lot of atmosphere, with sand on the floors and wooden stools to perch on (that didn't always sit straight on the ground). We went back to this restaurant a few nights later on a non-themed night (I had ribs that time).

View from a pier right across from the restaurant.
I think this was actually taken on Moorea, but I'm posting here anyway. Sunsets were gorgeous!


The next day, my husband and his brother went on a jet skiing tour. My SIL couldn't go because she was pregnant so I chose to stay with her. We explored a shop in walking distance from the hotel (I got a shirt for Luke) as well as a small convenience store, where we got some snacks. Then we went back to our bungalows and sat out on the deck, reading, until the guys got back. (I read four and a half books during the trip.)

One of the trips we did all go on was a snorkeling adventure, which was supposed to be about three hours long but turned out to be closer to five hours! Good thing we brought extra sunscreen! (Unfortunately, my SIL didn't reapply sunscreen as often as she should have and got a little too much sun on her arms and thus didn't feel very good the rest of that day or the next.) And good thing that I had a motion sickness patch to wear (I definitely needed it!) that day. But the trip was so worth it! Our two tour guides were really funny and they also serenaded us with the ukulele and singing while we were on the boat. It was nice because it was just 8 of us (four couples) on this tour.


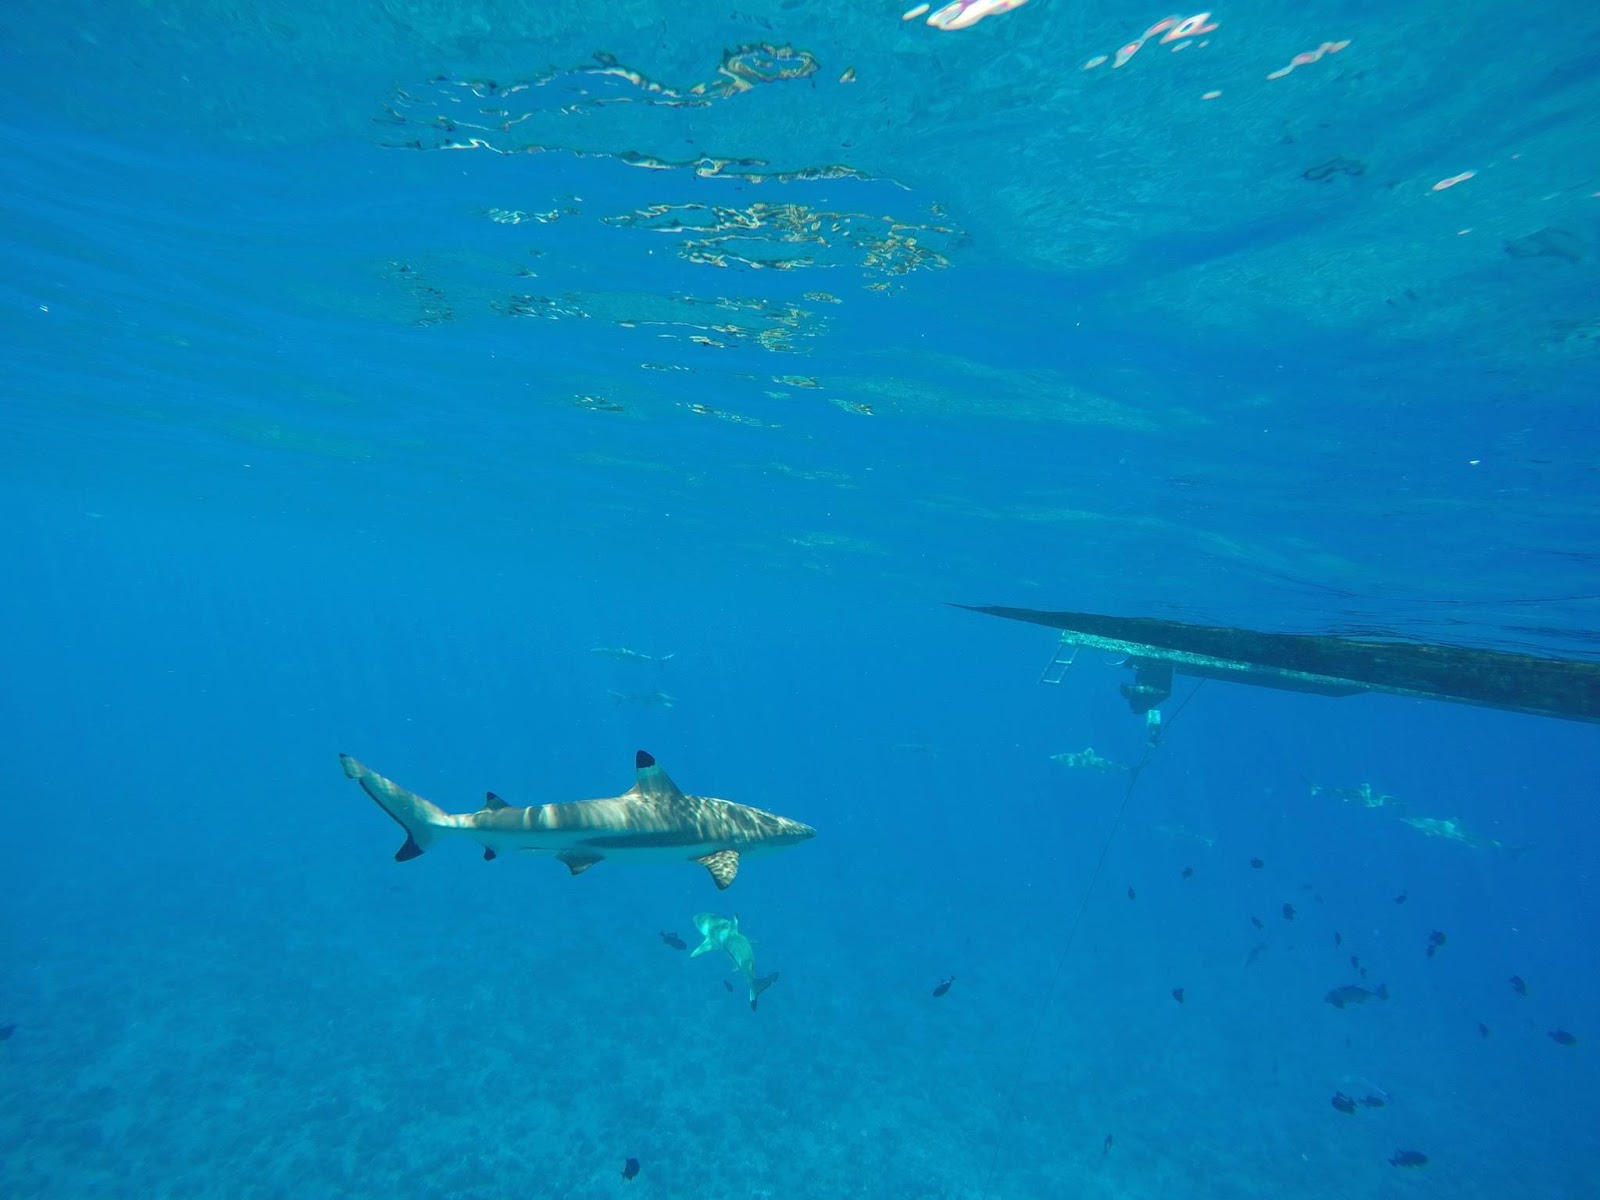
The first stop was to swim with sharks. Yup, sharks. They were mostly reef sharks as well as a couple of lemon sharks (or maybe they were nurse sharks--my husband and his brother each heard something different from the tour guide). We got right into the water with them! Eek! The water was fairly deep where we were and the sharks didn't come right up to us, but there was nothing stopping them from doing so!


My favorite stop was the second one where we got to swim in shallower water and feed some sting rays. Here, the rays were right there with us and we got to touch them and have them come right up to us (even having them swarm us if we were feeding them).


I could have stayed there with those rays for quite a while (and we did), but our guides noticed some of the other boats had stopped a little ways out from where we were and discovered that they had found some manta rays. One of my husband's biggest wishes on this trip was to see manta rays, so he was so excited about that! Apparently, it was pretty rare to get to see them on this tour, so we were quite lucky! And there were three of them that we got to see. They didn't come up to us, but we got to swim right over them, and boy were they huge!


After that, we went to a coral garden and got to see (and feed) lots of fish. My husband saw an octopus, but I wasn't near him at the time so I missed it. But the fish. So many different kinds! We ended the tour by going to a small island and eating fresh fruit and drinking fresh fruit juice. I think this tour was my favorite part of our entire trip.


After two nights of staying in the beach bungalow, we moved to one of the over the water bungalows for the last two nights on Bora Bora. It was really neat to walk out our door and just look down and see fish (or go for a swim right there). Walking to our bungalow was when we saw the ray in the water there. But we didn't even have to leave the bungalow to see fish as the coffee table in that bungalow was made of glass with a glass bottom so we could just sit and watch fish from right there!


I don't have a lot to say about the food on this trip since as I mentioned, I'm not big on seafood, but my husband who loves seafood (and doesn't get it often since I don't like it) really enjoyed everything that he tried. I stuck mostly to beef, chicken, and pepperoni pizza. My husband got seafood pizza at two different places and said both were excellent.

After our four nights on Bora Bora, we got back on the little plane to go back to the island of Tahiti. From there, we took a ferry across to the island of Moorea, where we were staying for the remainder of our trip. Here, we had rented a private house for our lodging, so we also rented a car. Mostly, there was one road that went around the entire island, so there were some really great views as we were driving.

The house we stayed at was gorgeous and was right on the beach. The only problem was that only two of the four bedrooms were air conditioned (which wasn't a problem as far as the bedrooms since we needed only two anyway). So to feel comfortable in the rest of the house, it was best to open the front and back doors to allow the breeze to come through (or to just sit outside in the breeze). However, the problem there was the mosquitoes! Although we had some good bug spray and we sprayed ourselves liberally with it, we all got quite a few mosquito bites during our time at the house. So much so that we didn't spend as much time outside or with the doors open as we would have liked. So I feel that we didn't get to take as much advantage of the location of the house with the beach access as we could have.

View from the back of the house
View from the front of the house
While on Moorea, we went to the Lagoonarium, which took us out to a small island off the coast which had a wonderful coral garden. Ropes were set up along the perimeter of the garden for use as a guide (and they were needed because the current was quite strong in a few places). I made one trip around the ropes (which took quite a while) and saw even more fish than I had seen before. After that, I was quite tired, so I sat out on the beach (it was an overcast day, which was actually quite nice) with my SIL while my husband and his brother went around again. Then the guide there did a feeding, and we got to see a moray eel (cool!) and more rays and reef sharks. I didn't get back in the water at that point, just watched from the shore, but my husband was in the water and this time the sharks got even closer than on our other trip! We hadn't fed the sharks on the other trip, but the guy here did (making sure the people stayed back out of the feeding area) and wow! Those sharks are super fast!


There was a place on Moorea where we could have swam with dolphins, and I really wanted to do that, but it was really expensive and pregnant women (my SIL) weren't allowed to do it, so we opted out of that experience. Alas. We also didn't see any sea turtles (my son kept asking if we had seen any so it was sad to have to tell him no). But everything we did get to see was really amazing.

The trip back wasn't pleasant. Because of the timing of the ferry and our flight out of Tahiti, we had to sit at the airport for about six hours. The un-airconditioned airport. Then I didn't sleep very much on the flight, just dozed off and on. So I was really really happy to get home. And I have to be honest, the heat and the mosquitoes were really bad and took away a lot from the overall experience (especially on Moorea). This trip was really a trip for my husband (being fully honest here, I'm not really a beach person. *gasp*) and he had an amazing time. And despite the heat and the itching from all my mosquito bites, I'm glad that I went and especially glad that I swam with the rays. But our next travel destination is my choice. So now it's time for us to start earning credit card points again because next up will be Scotland!

Saturday, March 12, 2016

Behind the Scenes: Dyes and Colors

Behind the Scenes of Yarn Dyeing with Round Table Yarns: Dyes and Colors

I've been a fan of indie dyed yarn for a number of years. Before I started dyeing myself, I had only a vague idea of what went into dyeing yarn. I knew there were a lot of steps I probably had no clue about, but I wasn't sure what those might be. So I'm going to let you guys behind the scenes of Round Table Yarns.

Behind the Scenes of Yarn Dyeing with Round Table Yarns: Dyes and Colors
Undyed yarn, waiting to be "chosen" to have color added. I currently use two suppliers for my undyed yarn. Both are U.S. companies; one uses American wool sources and the other uses British wool sources.

Behind the Scenes of Yarn Dyeing with Round Table Yarns: Dyes and Colors
My dyeing setup. I dye in the kitchen, using acid dyes. I'm careful to keep my dyeing area and food preparation area separate, and I never use something for both dyeing and cooking (note the For Dyeing Only note on the side of the crock pot).

For dyeing yarn, a lot of options are available, from using Kool-Aid and food dyes to professional acid dyes. I went straight to the acid dyes, which are used to dye animal fibers. (For dyeing something like cotton, different types of dyes are used.) Basically, acid dyes need two things to set the color on the yarn: acid and heat. The acids most often used are vinegar and citric acid. After starting with vinegar, I moved to citric acid because vinegar has a strong odor, especially when being heated. The heat can be anything from a pot on the stove or crock pot to steaming in the microwave or oven.

But once I made the acid dye selection, I still had a lot of options in front of me. Which brand of dyes should I use? Some brands have tons of colors and other brands have only a small handful. I ended up choosing a starter set of Greener Shades Dyes, which comes with nine colors: a warm red, a cool red, blue, purple, green, orange, yellow, aqua, and black. And that's actually all of the colors that Greener Shades produces. I decided to go with these dyes because I liked that I can't choose from a bunch of different pre-mixed colors. I wanted to be able to do my own mixing for colors and knew that if I had a bunch of other options, I might be tempted to just use colors straight out of the jar instead of mixing my own (I'm not saying that I couldn't mix my own with tons of options, just that I personally might not have experimented as much). Plus I don't have a ton of space for dyeing so I don't have to store a lot of different colors.

I was worried for a while that I wouldn't be able to mix dyes to get some of the colors I wanted to create. A deep pink was one such color that I was unsure how to achieve. I started by just doing a less intense red, but it wasn't getting the true pink I wanted. So I experimented. And I was able to mix some of my dyes to create exactly the shade I wanted, which is the Gwynedd colorway (picture below). When that one came out of the dyepot, I did a happy dance! I'm much more confidant about experimenting and getting different colors now.

Behind the Scenes of Yarn Dyeing with Round Table Yarns: Dyes and Colors
I did have some problems with the black, which depending on the dyes has a tendency to "break"--which means it splits into its component parts (because black is not truly a solid color but is itself a blend of colors). Sometimes, that can have a neat effect, bringing out a slight blue or purple to the black/grey. But other times, it doesn't work as well. I kept getting browns mixed into my black and that was not at all the effect I was going for. (Several of the Quest colors are greys that broke--see picture below.)

Behind the Scenes of Yarn Dyeing with Round Table Yarns: Dyes and Colors
So after a lot of research, I decided to try a different brand of dye for black, with the aptly named colorway "True Black." It is indeed a true black, so I've switched to that brand just for the black.

At first, I was mixing up dye stock (putting a certain amount of dye powder into a certain amount of water) and then using syringes to measure out how much dye to add to the yarn. But I found that I wasn't always getting the most accurate results that way. For example, the Tristan colorway is actually a blend of four different colors. Getting even one of those out of balance can have a big effect on the final results, as evidenced by these two skeins on Tristan on the Lancelot base.

Behind the Scenes of Yarn Dyeing with Round Table Yarns: Dyes and Colors
I wanted more color accuracy for repeatable colorways. So I got a scale that measures to the hundredth gram, and now I mix up dye for each dye lot rather than making up dye stock. It is a little more work, but I'm much happier with being able to repeat colorways and having them match much better. (Different dyelots will always have some variation, but I don't want to have as much variation as shown above!)

Behind the Scenes of Yarn Dyeing with Round Table Yarns: Dyes and Colors

Behind the Scenes of Yarn Dyeing with Round Table Yarns: Dyes and Colors 

Saturday, March 5, 2016

Behind the Scenes: The process of designing, test knitting

Behind the Scenes of Designing Knitting Patterns with KarenDawn Designs: Test Knitting

Some designers don't do test knitting--if you have a good tech editor, test knitting isn't truly needed. But I enjoy the test knitting process so for most patterns, I will do both tech editing and test knitting. But what does test knitting mean?

Basically, test knitters are volunteer knitters who get a copy of the pattern before it is released and are asked to make that project based upon exactly what is written down (so no alterations). If it's a pattern in multiple sizes, then generally the designer tries to find at least one test knitter per size. Sometimes test knitters are split into those who will follow the written instructions and those who will use charts, to make sure both ways of reading the pattern are covered.

As the test knitter works through the pattern, he or she alerts the designer to any problems or questions that come up. Sometimes it might be an error and sometimes it might just be that some wording is unclear. It's nice to have a range of levels of experience within the test knitter group to make sure the pattern instructions are written as well as possible for both beginning knitters and more experienced knitters.

Test knitters also are usually asked about their gauge, yarn usage, and finished object dimensions. That way the designer can check to make sure that what has been designed can be recreated, and if there are large discrepancies (such as every test knitter using twice as much yarn as the designer used), then the designer can try to figure out that issue before releasing the pattern to the public.

When the pattern is released, test knitters are asked to link their project pages to the pattern page. This is helpful for other knitters who might be interested in the pattern but might not want to be the first one to try out a pattern--since the test knitters have already completed some projects, the other knitters can be more confidant that the pattern will actually yield the intended object. (Because, as wonderful as self-publishing patterns can be, it does mean anyone can publish a pattern and sometimes those patterns aren't as polished as they could be, leaving knitters frustrated over the instructions.) Also, since most test knitters use a different yarn than the one used by the designer, it shows right away some other options for yarn selection.

Several of you on this mailing list have done test knitting for me (thank you!), but if you haven't done so and would be interested in testing my future patterns, please let me know. I do all of my test knits in my Ravelry group. (Here's an example of a previous test knit, for the Brangien Hat.) I have a list of people that I earburn whenever there is a new test and they get first shot at testing new patterns (spaces are limited and usually fill up pretty quickly). So if you'd like to be added to that earburn list, just send me a message, tell me your Ravelry name, and I'll add you to the list.

~~~~~~~~~~~~~~~~~~~

The content in this post was first featured in my newsletter (July 20, 2015). If you'd like to keep up to date on my designs and yarn and receive content like this right in your email inbox, make sure to subscribe to my newsletter.