I don't know about you, but self-striping sock yarn has become a favorite of mine. I always have a "plain vanilla" sock on the needles so when I want to knit but not think too much about my knitting, I can work on it. It's also a great travel project and is what I usually bring to my weekly knit night. But doing a plain sock over and over again can get boring. Enter self-striping sock yarn! With it, you can have fun watching the stripes progress, wondering what color is coming next, which livens the knitting.
When I was at DFW Fiber Fest in 2015, all the yarn I bought was self-striping sock yarn. At first, I thought I wouldn't actually dye any myself, so I needed to get it all from other dyers. But wow! Self-striping yarn can be expensive. Now that I'm actually making it myself, I totally understand why. It's a rather labor-intensive process. But it's so rewarding that it is worth the process, so I've been hard at work developing my own process and colorways. And in this blog post (and upcoming ones), I'll be taking you behind the scenes of how I dye self-striping yarn.
To dye yarn so it creates stripes as it is knit, long sections of each color need to be dyed. But if you just take a skein of yarn as it is sent from the supplier, the loop of the skein has a small diameter. To get the long sections of yarn for each color, the first step is to reskein the yarn into a very very large skein. Dyers have various methods to do this and I've tried three, finally settling on one as the method that works best for me.
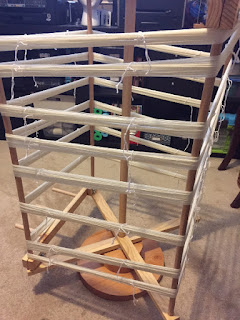
So based upon how many stripes I'm going to be doing, I'll wrap the yarn a certain number of times around the warping reel. I also do more than one skein at a time (again, depending on the number of stripes), which is really helpful.
Once I have the yarn reskeined, I have to remove it from the warping reel. But dealing with a gigantic skein of yarn can lead to tangles, so the major key here is to add lots and lots of choke ties. So before taking it off the warping reel, I cut short lengths of a white cotton yarn and create loose choke ties throughout the entire skein.
I also have a colored cotton yarn that I use to measure off the increments to know how much of each color to dye (so if I'm going to do four even stripes, I'll measure and divide the skein into four parts and place colored ties to mark them).
It varies depending on how many skeins I do at once (2-4) and how big the circumference is, but it generally takes me well over an hour to prepare the skeins. And I haven't even started dyeing it yet!
~~~~~~~~~~~~~~~~~~~
The content in this post was first featured in my newsletter (August 5, 2015). If you'd like to keep up to date on my designs and yarn and receive content like this right in your email inbox, make sure to subscribe to my newsletter.


No comments:
Post a Comment