Saturday, March 12, 2016

Behind the Scenes: Dyes and Colors

Behind the Scenes of Yarn Dyeing with Round Table Yarns: Dyes and Colors

I've been a fan of indie dyed yarn for a number of years. Before I started dyeing myself, I had only a vague idea of what went into dyeing yarn. I knew there were a lot of steps I probably had no clue about, but I wasn't sure what those might be. So I'm going to let you guys behind the scenes of Round Table Yarns.

Behind the Scenes of Yarn Dyeing with Round Table Yarns: Dyes and Colors
Undyed yarn, waiting to be "chosen" to have color added. I currently use two suppliers for my undyed yarn. Both are U.S. companies; one uses American wool sources and the other uses British wool sources.

Behind the Scenes of Yarn Dyeing with Round Table Yarns: Dyes and Colors
My dyeing setup. I dye in the kitchen, using acid dyes. I'm careful to keep my dyeing area and food preparation area separate, and I never use something for both dyeing and cooking (note the For Dyeing Only note on the side of the crock pot).

For dyeing yarn, a lot of options are available, from using Kool-Aid and food dyes to professional acid dyes. I went straight to the acid dyes, which are used to dye animal fibers. (For dyeing something like cotton, different types of dyes are used.) Basically, acid dyes need two things to set the color on the yarn: acid and heat. The acids most often used are vinegar and citric acid. After starting with vinegar, I moved to citric acid because vinegar has a strong odor, especially when being heated. The heat can be anything from a pot on the stove or crock pot to steaming in the microwave or oven.

But once I made the acid dye selection, I still had a lot of options in front of me. Which brand of dyes should I use? Some brands have tons of colors and other brands have only a small handful. I ended up choosing a starter set of Greener Shades Dyes, which comes with nine colors: a warm red, a cool red, blue, purple, green, orange, yellow, aqua, and black. And that's actually all of the colors that Greener Shades produces. I decided to go with these dyes because I liked that I can't choose from a bunch of different pre-mixed colors. I wanted to be able to do my own mixing for colors and knew that if I had a bunch of other options, I might be tempted to just use colors straight out of the jar instead of mixing my own (I'm not saying that I couldn't mix my own with tons of options, just that I personally might not have experimented as much). Plus I don't have a ton of space for dyeing so I don't have to store a lot of different colors.

I was worried for a while that I wouldn't be able to mix dyes to get some of the colors I wanted to create. A deep pink was one such color that I was unsure how to achieve. I started by just doing a less intense red, but it wasn't getting the true pink I wanted. So I experimented. And I was able to mix some of my dyes to create exactly the shade I wanted, which is the Gwynedd colorway (picture below). When that one came out of the dyepot, I did a happy dance! I'm much more confidant about experimenting and getting different colors now.

Behind the Scenes of Yarn Dyeing with Round Table Yarns: Dyes and Colors
I did have some problems with the black, which depending on the dyes has a tendency to "break"--which means it splits into its component parts (because black is not truly a solid color but is itself a blend of colors). Sometimes, that can have a neat effect, bringing out a slight blue or purple to the black/grey. But other times, it doesn't work as well. I kept getting browns mixed into my black and that was not at all the effect I was going for. (Several of the Quest colors are greys that broke--see picture below.)

Behind the Scenes of Yarn Dyeing with Round Table Yarns: Dyes and Colors
So after a lot of research, I decided to try a different brand of dye for black, with the aptly named colorway "True Black." It is indeed a true black, so I've switched to that brand just for the black.

At first, I was mixing up dye stock (putting a certain amount of dye powder into a certain amount of water) and then using syringes to measure out how much dye to add to the yarn. But I found that I wasn't always getting the most accurate results that way. For example, the Tristan colorway is actually a blend of four different colors. Getting even one of those out of balance can have a big effect on the final results, as evidenced by these two skeins on Tristan on the Lancelot base.

Behind the Scenes of Yarn Dyeing with Round Table Yarns: Dyes and Colors
I wanted more color accuracy for repeatable colorways. So I got a scale that measures to the hundredth gram, and now I mix up dye for each dye lot rather than making up dye stock. It is a little more work, but I'm much happier with being able to repeat colorways and having them match much better. (Different dyelots will always have some variation, but I don't want to have as much variation as shown above!)

Behind the Scenes of Yarn Dyeing with Round Table Yarns: Dyes and Colors

Behind the Scenes of Yarn Dyeing with Round Table Yarns: Dyes and Colors 

Saturday, March 5, 2016

Behind the Scenes: The process of designing, test knitting

Behind the Scenes of Designing Knitting Patterns with KarenDawn Designs: Test Knitting

Some designers don't do test knitting--if you have a good tech editor, test knitting isn't truly needed. But I enjoy the test knitting process so for most patterns, I will do both tech editing and test knitting. But what does test knitting mean?

Basically, test knitters are volunteer knitters who get a copy of the pattern before it is released and are asked to make that project based upon exactly what is written down (so no alterations). If it's a pattern in multiple sizes, then generally the designer tries to find at least one test knitter per size. Sometimes test knitters are split into those who will follow the written instructions and those who will use charts, to make sure both ways of reading the pattern are covered.

As the test knitter works through the pattern, he or she alerts the designer to any problems or questions that come up. Sometimes it might be an error and sometimes it might just be that some wording is unclear. It's nice to have a range of levels of experience within the test knitter group to make sure the pattern instructions are written as well as possible for both beginning knitters and more experienced knitters.

Test knitters also are usually asked about their gauge, yarn usage, and finished object dimensions. That way the designer can check to make sure that what has been designed can be recreated, and if there are large discrepancies (such as every test knitter using twice as much yarn as the designer used), then the designer can try to figure out that issue before releasing the pattern to the public.

When the pattern is released, test knitters are asked to link their project pages to the pattern page. This is helpful for other knitters who might be interested in the pattern but might not want to be the first one to try out a pattern--since the test knitters have already completed some projects, the other knitters can be more confidant that the pattern will actually yield the intended object. (Because, as wonderful as self-publishing patterns can be, it does mean anyone can publish a pattern and sometimes those patterns aren't as polished as they could be, leaving knitters frustrated over the instructions.) Also, since most test knitters use a different yarn than the one used by the designer, it shows right away some other options for yarn selection.

Several of you on this mailing list have done test knitting for me (thank you!), but if you haven't done so and would be interested in testing my future patterns, please let me know. I do all of my test knits in my Ravelry group. (Here's an example of a previous test knit, for the Brangien Hat.) I have a list of people that I earburn whenever there is a new test and they get first shot at testing new patterns (spaces are limited and usually fill up pretty quickly). So if you'd like to be added to that earburn list, just send me a message, tell me your Ravelry name, and I'll add you to the list.

~~~~~~~~~~~~~~~~~~~

The content in this post was first featured in my newsletter (July 20, 2015). If you'd like to keep up to date on my designs and yarn and receive content like this right in your email inbox, make sure to subscribe to my newsletter.

Saturday, February 27, 2016

Behind the Scenes: The process of designing, photography

Behind the Scenes of Designing Knitting Patterns with KarenDawn Designs: Photography

As a self-published designer, many of the roles of publishing a pattern fall on my shoulders unless I seek help. And at first, I didn't think that I needed help for photography. I invested in a good camera and tried to learn as much as possible about taking pictures, all about f-stops and aperture and whatnot, reading books and instructions online and even taking some Craftsy classes. Then I had to set up photo shoots, find a model (my sister graciously agreed to be my model) and work with her schedule, and then learn how to edit the photos afterwards. It's a whole separate job by itself, and I never imagined that as part of designing knitting patterns I would become a photographer, too!

And I felt like I hit a plateau after a while. Unless I really wanted to devote some serious time to it, I didn't see myself getting any better at the photography portions. And although my later photographs are better than my earlier attempts, quite frankly, it's not part of the process that I love. It's become quite a labor. So I thought about hiring a photographer, but that can get expensive fast.

Then Stitch Definition was created. I'm sure you've heard me mention this small business before. Anne runs the photography side of the business. She sets up photo shoots, has a professional photographer and models, styles the photos, and makes sure the photographer gets the needed shots. And because several designers are having pieces photographed at the same time, the cost for each photo shoot is split up among them, making it so much more affordable.

I sent off some of my earlier designs for new photos in May 2015. It is a little strange to see my designs on someone who is not my sister, but it feels good to know that I have this option for future designs. If I want to do the photography myself, I can. But if I'm not feeling up to it myself (like for the Gawain's Shield collection), I know where to go for help.

By the way, I'm not alone in struggling with photos for my patterns. In the Designers group on Ravelry, there's a thread for designers to post possible photographs and asking for opinions/votes on which photo to choose as the main photo (or whether to reshoot). I've learned a lot by reading through and participating in that thread

Behind the Scenes of Designing Knitting Patterns with KarenDawn Designs: Photography
Here's one of my early pictures (actually my first photo shoot with my sister) with the Lyonet Hat. I picked the neighborhood playground as a location because our kids could play while we were taking pictures, but I didn't realize that there wasn't much shade there. And we met when the sun was pretty high overhead, which meant the lighting was not good. And there was no styling or set up. We just plopped the hat on my sister's head and that was it.
Behind the Scenes of Designing Knitting Patterns with KarenDawn Designs: Photography
Here's one of the pictures from the new photo shoot (it's the same hat pattern; I just made a new sample in a different color). Although it's not perfect (the details of the hat aren't quite as clear as they could be--I have other shots of this hat with better details), the composition and styling are a bit more interesting.
Photo by JS Webb Photography.
 
~~~~~~~~~~~~~~~~~~~

The content in this post was first featured in my newsletter (July 20, 2015). If you'd like to keep up to date on my designs and yarn and receive content like this right in your email inbox, make sure to subscribe to my newsletter.

Saturday, February 20, 2016

Behind the Scenes: The process of designing, Tech Editing

Behind the Scenes of Designing Knitting Patterns with KarenDawn Designs: Tech Editing


A good tech editor is an absolute necessity

Have you ever tried to knit from a pattern and just have no idea what the designer is trying to explain? Have you checked your stitches over and over but still come up with a different number than what is in the pattern? Maybe it's not you. Maybe the pattern just isn't very well written and the pattern has some mistakes. That pattern has most likely not been tech edited.

After being frustrated by several patterns I've tried to knit, I've decided not to work on a pattern if it is clear that it hasn't been tech edited. I may be a little bit biased because my other job is as a copy editor, so I do believe in the value of editing. But tech editing for knitting patterns really is essential to make sure the pattern is as clear as possible so the knitter's experience doesn't end in frustration.

So what is a tech editor? A tech editor is someone who goes over the pattern and, in essence, knits it in her mind, checking to make sure all parts of the pattern make sense, as much information as possible is provided, and that all of the numbers work out. The tech editor does not actually knit the pattern (although I have heard of some who occasionally do quick swatches). Joeli of Joeli's Kitchen is a tech editor and also offers training courses for people who want to be tech editors. She's created a series of blog posts about tech editors; these posts do a great job explaining what tech editing is all about, so I'm going to let her describe what a tech editor does:

"A tech editor goes through a pattern top to bottom, line by line, checking for errors, inconsistencies, problems, better ways of writing things, and so on. They meticulously go through the pattern with a fine tooth comb; checking stitch counts, making sure the gauge gives the right measurements, looking at wording, looking for deviations from the style sheet." (from All About That Tech Editor -- the entire blog post is very educational, so I'd recommend clicking over there and reading her full post)

I've worked with three different tech editors and have had good experiences with all of them. They've helped me clear up my patterns and make them better so that you guys can have a better knitting experience.

Although it's not always clear if a pattern has been tech edited (I always add a thank you to my tech editor on my Ravelry pattern page), it's good to choose patterns to knit that have been through the tech editing process if you can. It doesn't mean that a pattern will be completely error free (tech editors are human after all), but it does mean that the pattern is in the best possible shape, which makes for much less frustration on your part when you sit down to knit.
~~~~~~~~~~~~~~~~~~~

The content in this post was first featured in my newsletter (June 20, 2015). If you'd like to keep up to date on my designs and yarn and receive content like this right in your email inbox, make sure to subscribe to my newsletter.

Saturday, February 13, 2016

Behind the Scenes: The process of designing, Yarn Selection and Knitting the Sample

Behind the Scenes of Designing Knitting Patterns with KarenDawn Designs: Yarn Selection and Knitting the Sample

Most of the time, I have picked out the yarn I want to use before I get too far into the process. For example, with the Astolat Shawl, I knew before I even started looking into stitch patterns that I wanted to use the madtosh sock in the brown color. Other times I might have a general idea that I want to use a certain weight of yarn or fiber content and then pick out the actual yarn (and color) once I have everything planned out.

I always think about the finished effect I want the object to have when I'm picking out the yarn. I knew, for example, that I wanted The Wife of Bath's Cowl to be a little more on the "sturdy" side since I envisioned large buttons on it and didn't want a super drapey yarn which wouldn't be able to hold up the buttons. So I picked Spud & Chloƫ Fine because it had a tighter twist and seemed to be able to hold up nicely. But with the Dorigen Cowl, I knew that I wanted drape and maybe a little bit of a fuzzy halo effect, so the Classic Elite Fresco, which contains alpaca and angora, really helped to create both the drape and halo I had envisioned.

Once I have the basic outline of the pattern and the yarn, I start my sample. These days, I knit using the knitCompanion app on my iPad rather than a paper pattern. So I convert my sample pattern to PDF format and set it up in knitCompanion. I'm able to add notes as I go in case I want to make any changes or find something that doesn't work as I'm working on the sample (and I usually have at least one change from the original).

I do try to make sure I keep notes while I'm knitting the sample, but there have been a couple of times when my notes are either pretty cryptic or I think "oh, I'll remember that" and don't make a note--and then I don't remember it after all! That can be pretty frustrating because I usually have to go back to the sample and either redo something (usually in a swatch) or try to figure out from the sample what I did. I have gotten a lot better about this so I'm experiencing much less frustration these days!

Once I finish knitting the sample, I block it and the gauge swatch (if I hadn't done that already), and take the measurements to add into the pattern. I flesh out the pattern, putting it into my pattern template, and make it as close to the finished product as possible. I take a couple of quick pictures, and then I send out a call for test knitters, which is one of the topics I'll discuss in an upcoming blog post.

~~~~~~~~~~~~~~~~~~~

The content in this post was first featured in my newsletter (June 20, 2015). If you'd like to keep up to date on my designs and yarn and receive content like this right in your email inbox, make sure to subscribe to my newsletter.

Friday, February 12, 2016

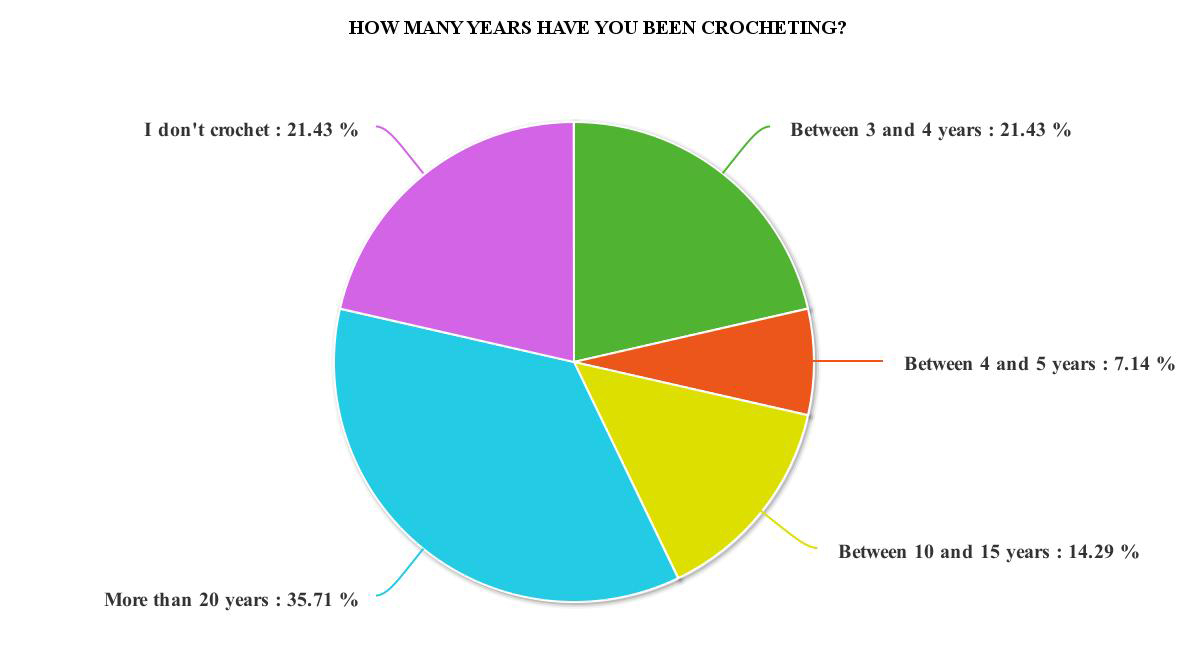
Knitting and Crocheting Survey

I sent out a survey to my mailing list subscribers asking three questions: Do you knit or crochet? How long have you been knitting? How long have you been crocheting? Here are the results!


Saturday, February 6, 2016

Behind the Scenes: The process of designing, making charts

Behind the Scenes of Designing Knitting Patterns with KarenDawn Designs: Making Charts

 I love graph paper these days. I have several different types of graph paper with different sized squares. I use it to play with stitch patterns and to layout how those stitches will work together in the actual design. I also go through a lot of pencil lead and erasers!


Behind the Scenes of Designing Knitting Patterns with KarenDawn Designs: Making Charts
The picture above shows a sketch on graph paper for a shawl (or rather half of a triangular shawl--it gets repeated for the other half). With this sketch, one piece of graph paper wasn't enough to be able to get a good representation of the chart, so I had to tape multiple pieces of graph paper together. I remember spreading this out on my kitchen table and working on it there because my desk wasn't big enough!
Once I have a stitch pattern charted out on graph paper, I move to my computer and use my charting program to draw the chart. (I use StitchMastery, which I really like, but there are several other program options out there.) From there, I write up a quick set of instructions for the pattern, insert the charts, and start my sample knit.

~~~~~~~~~~~~~~~~~~~

The content in this post was first featured in my newsletter (June 20, 2015). If you'd like to keep up to date on my designs and yarn and receive content like this right in your email inbox, make sure to subscribe to my newsletter.